Hello everyone! How are you all?
My nails are now nubbies again. I cut a little too much when I was clipping my nails. They were getting quite long anyways. I don't think I've ever had them this short for the blog before, but I really like them. It feels sort of...liberating to have nubs. It's kind of like a weight is being lifted from your nails if that makes sense lol. They should grow back in a few weeks, but for now we'll have to deal with my nubs.
Today, I have a swatch of NYC's Lincoln Square Lavender for you.
Lincoln Square Lavender is a pink creme with a hint of lavender. It's definitely a pink polish though. The name is a bit misleading, but at least it's catchy though. This is two coats without a top coat.
The formula and application was good. This is the quick drying nail polish and it did dry pretty fast. It was a little over a minute, but still a fast dry time.
Honestly, I'm on the fence with this polish. I like the color, but I don't love it. It's a bit boring. It's not really unique to me, which is why I won't be wearing this too much.
To spice it up a bit, I added some pizazz! Well, China Glaze's Pizazz to be exact. This glitter really makes the color pop out more. I like it better with the glitter than by itself.
Overall, I like this polish but it's a bit boring. It's not going to be a go to polish for me. I think it looks way better with some glitter on top, so that's how I'll be wearing this polish the next time I wear it.
What do you think of this polish? What's your favorite glitter polish?
Thanks for reading!
Showing posts with label nail polish. Show all posts
Monday, November 18, 2013
Wednesday, November 13, 2013
OPI-Stay the Night
Hey everyone!
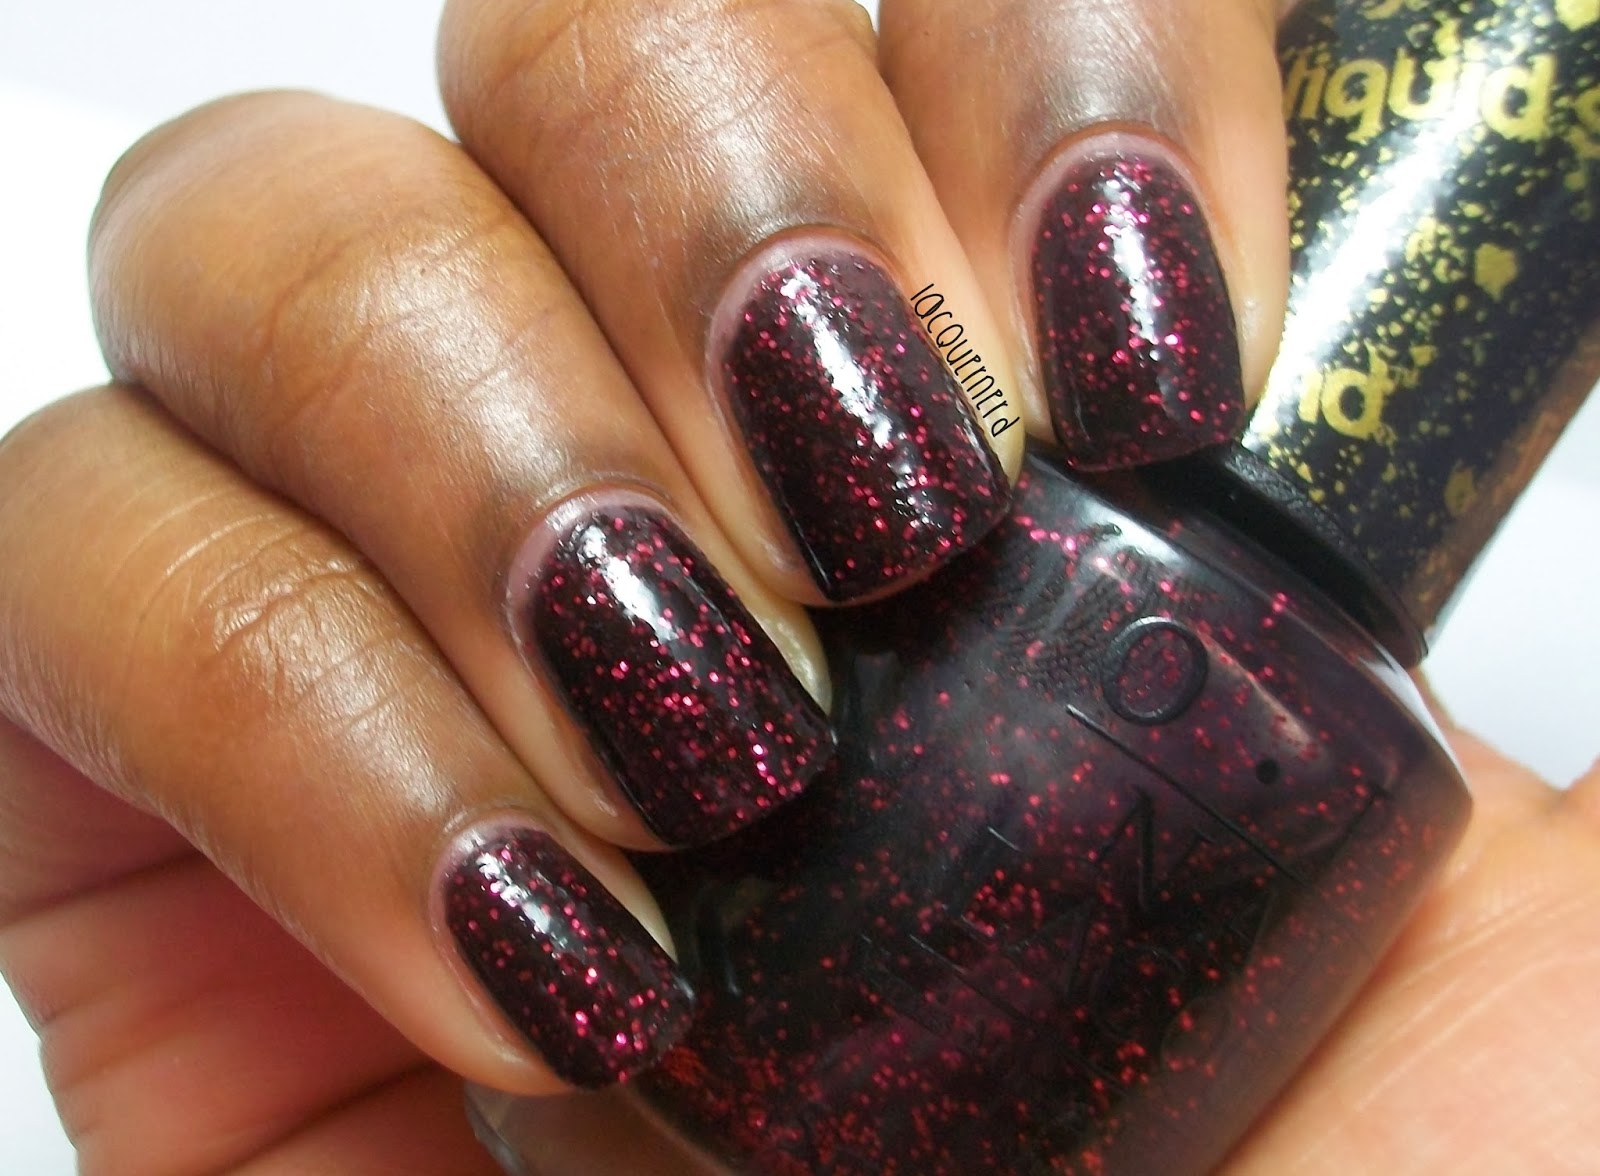
Today, I have a swatch of OPI's Stay the Night for you. This is a part of the Mariah Carey Liquid Sand Collection that came out last year, but I recently paid a visit to Marshalls and bought Stay the Night and Get Your Number (both were in the OPI Holiday Duo Pack) for only $7.99 compared to $18 for the pack. If you're looking for these liquid sands, I would visit Marshalls to see if they have the rest of the colors.
Stay the Night is a textured black with bright pink glitter. This is three coats without a top coat. The formula was quite sheer with the first coat, but leveled out with the second and third coat. I had no problems with the application, it was easy to work with. The texture is gritty, but it's very subtle.
I wanted to see what it looked like with a top coat, so I slabbed on a thick coat of top coat. As you can see, the glitters are more prominent and pop out more with the top coat. Also, you can still feel the texture but it's much smoother than without.
I only used one coat of top coat, but if you want more of a glossy finish, I'd recommend using a couple more coats. I honestly prefer this polish without the top coat, but I also love the way it looks with top coat.
What do you think of this polish? Do you like textured polishes?
Thanks for reading!
Today, I have a swatch of OPI's Stay the Night for you. This is a part of the Mariah Carey Liquid Sand Collection that came out last year, but I recently paid a visit to Marshalls and bought Stay the Night and Get Your Number (both were in the OPI Holiday Duo Pack) for only $7.99 compared to $18 for the pack. If you're looking for these liquid sands, I would visit Marshalls to see if they have the rest of the colors.
Stay the Night is a textured black with bright pink glitter. This is three coats without a top coat. The formula was quite sheer with the first coat, but leveled out with the second and third coat. I had no problems with the application, it was easy to work with. The texture is gritty, but it's very subtle.
I wanted to see what it looked like with a top coat, so I slabbed on a thick coat of top coat. As you can see, the glitters are more prominent and pop out more with the top coat. Also, you can still feel the texture but it's much smoother than without.
I only used one coat of top coat, but if you want more of a glossy finish, I'd recommend using a couple more coats. I honestly prefer this polish without the top coat, but I also love the way it looks with top coat.
What do you think of this polish? Do you like textured polishes?
Thanks for reading!
Saturday, November 9, 2013
Sally Hansen-Cherry, Cherry Bang, Bang!
Hello everyone!
I wasn't going to do a Saturday post today, but I'm still trying to figure out what days would be best for me to post. Currently, I post on Monday, Wednesday, and Friday, but I hate having the gap between Saturday and Sunday. I'm also messing around with the time as well. If anyone has any suggestions as to what times are best to post, let me know!
For today, I have a swatch of Sally Hansen's Cherry, Cherry Bang, Bang! I used this as a base for a nail art design that I did a few days ago, which will be posted soon. I've worn this before once, but I forgot how pretty this color is!
Cherry,Cherry Bang,Bang! is a purple with magenta undertones (purgenta? magenple? lol). This is two coats without a top coat. It's a little bit darker than what's showing in the photos, but I think it's because of the shine from the light.
This color is a part of the Sally Hansen Complete Salon Manicure collection. I bought this on sale at CVS for around $3-4. I remember that it was 50% as well. Typically, these polishes run around $7-8, but I usually see these polishes on some sort of sale during the year. If you want to save some money for a good polish, I'd recommend getting them on sale.
The formula was great to work it. I really had no problems with it. I also had no problems with the application. The Complete Salon Manicure polishes have a nice wide brush, which I love and makes it easier to apply the polish.
Overall, I would recommend buying this polish. Like I said earlier, these are a bit expensive, so I'd recommend getting them on sale if you're tight on money. I think it's a nice color to wear for the fall and winter, since it's darker but bright polish (if that makes sense lol), but you can wear it anytime of the year.
What do you think of this polish?
Thanks for reading!
I wasn't going to do a Saturday post today, but I'm still trying to figure out what days would be best for me to post. Currently, I post on Monday, Wednesday, and Friday, but I hate having the gap between Saturday and Sunday. I'm also messing around with the time as well. If anyone has any suggestions as to what times are best to post, let me know!
For today, I have a swatch of Sally Hansen's Cherry, Cherry Bang, Bang! I used this as a base for a nail art design that I did a few days ago, which will be posted soon. I've worn this before once, but I forgot how pretty this color is!
Cherry,Cherry Bang,Bang! is a purple with magenta undertones (purgenta? magenple? lol). This is two coats without a top coat. It's a little bit darker than what's showing in the photos, but I think it's because of the shine from the light.
This color is a part of the Sally Hansen Complete Salon Manicure collection. I bought this on sale at CVS for around $3-4. I remember that it was 50% as well. Typically, these polishes run around $7-8, but I usually see these polishes on some sort of sale during the year. If you want to save some money for a good polish, I'd recommend getting them on sale.
The formula was great to work it. I really had no problems with it. I also had no problems with the application. The Complete Salon Manicure polishes have a nice wide brush, which I love and makes it easier to apply the polish.
Overall, I would recommend buying this polish. Like I said earlier, these are a bit expensive, so I'd recommend getting them on sale if you're tight on money. I think it's a nice color to wear for the fall and winter, since it's darker but bright polish (if that makes sense lol), but you can wear it anytime of the year.
What do you think of this polish?
Thanks for reading!
Wednesday, October 30, 2013
L.A. Colors Pink Sizzle
Hey everyone!
I have a swatch of L.A. Colors Pink Sizzle for you today. I've had this polish since last Christmas I believe because I wasn't sure how the L.A.Color polishes were going to turn out. I guess I had that "dollar polish mentality" and thinking that it wasn't going to be good at first, and now I love it and I'll definitely be buying more L.A. Colors in the future.
Pink Sizzle is a magenta duochrome with gold and pink shimmer.This is two coats without a top coat. The duochrome is soft in this polish, but it is visible. It was opaque in two coats for me, but if I added a third coat, I think you could see more of the duochrome. The formula and application was excellent. I really didn't have any problems with this polish at all. I really love how the gold shimmer comes out in the polish.
Overall, I would recommend buying Pink Sizzle. I think it's a great polish at a good price. I'll be buying more L.A. Color polishes in the future.
What do you think of this polish?
Until next time!
This review was solely based on my honest opinion. I was not paid or asked to do this review for anyone.
I have a swatch of L.A. Colors Pink Sizzle for you today. I've had this polish since last Christmas I believe because I wasn't sure how the L.A.Color polishes were going to turn out. I guess I had that "dollar polish mentality" and thinking that it wasn't going to be good at first, and now I love it and I'll definitely be buying more L.A. Colors in the future.
Pink Sizzle is a magenta duochrome with gold and pink shimmer.This is two coats without a top coat. The duochrome is soft in this polish, but it is visible. It was opaque in two coats for me, but if I added a third coat, I think you could see more of the duochrome. The formula and application was excellent. I really didn't have any problems with this polish at all. I really love how the gold shimmer comes out in the polish.
I then added Color Club's Snowflakes to Pink Sizzle to bring it out more. I love how the flakes look, especially the orange with the gold shimmer. They go great together. It was kind of hard to capture the flakes, but I hope you all can see it.
Overall, I would recommend buying Pink Sizzle. I think it's a great polish at a good price. I'll be buying more L.A. Color polishes in the future.
What do you think of this polish?
Until next time!
This review was solely based on my honest opinion. I was not paid or asked to do this review for anyone.
Tuesday, September 24, 2013
31DC2013 Day 24: Inspired by a Book
Hello everyone! Today's post is going to be kind of short because my tendinitis is acting up real bad.
Instead of an "actual" book, I was inspired by a manga!
For those who don't know what a manga is, a manga is a Japanese comic book. I love reading them. The artwork and storylines always draw me in. I haven't read any mangas recently though, I should probably get on that! Anyone else read manga?
I was inspired by Ouran High School Host Club, which is one of my favorite mangas! I also based them on my favorite character, Honey!
Colors Used:
Sinful Colors Starfish
Sinful Colors Candy Coated
Sinful Colors Lavender
Sinful Colors Black on Black
Sinful Colors Nude
Wet n Wild's French White Creme
Sinful Colors Pink Forever
Sinful Colors Energetic Red
Wet n Wild's Tickled Pink
For these nails, I used my detail brush and dotting tools for the designs. For the pointer, I did a cake because of Honey's obsession with cake and sweets. The middle finger I drew Usa-chan, Honey's rabbit plushie. The ring finger is the Ouran High School school uniform. The pinky represents the rose petals that magically appear whenever Honey and the rest of the club enter a room. I think these nails are so cute, just like Honey! The cake is my favorite because I'm obsessed with sweets as well.
What do you think of this design? Do you have a favorite manga? Tomorrow is inspired by fashion!
Until next time!
Instead of an "actual" book, I was inspired by a manga!
For those who don't know what a manga is, a manga is a Japanese comic book. I love reading them. The artwork and storylines always draw me in. I haven't read any mangas recently though, I should probably get on that! Anyone else read manga?
Colors Used:
Sinful Colors Starfish
Sinful Colors Candy Coated
Sinful Colors Lavender
Sinful Colors Black on Black
Sinful Colors Nude
Wet n Wild's French White Creme
Sinful Colors Pink Forever
Sinful Colors Energetic Red
Wet n Wild's Tickled Pink
For these nails, I used my detail brush and dotting tools for the designs. For the pointer, I did a cake because of Honey's obsession with cake and sweets. The middle finger I drew Usa-chan, Honey's rabbit plushie. The ring finger is the Ouran High School school uniform. The pinky represents the rose petals that magically appear whenever Honey and the rest of the club enter a room. I think these nails are so cute, just like Honey! The cake is my favorite because I'm obsessed with sweets as well.
What do you think of this design? Do you have a favorite manga? Tomorrow is inspired by fashion!
Until next time!
Monday, September 23, 2013
31DC2013 Day 23: Inspired by a Movie
Hey everyone!
I'm really excited for these nails because it's inspired by one of my favorite movies: Kill Bill. I think I've seen the movie like 100 times already. In my sophomore year of college, I even did a monologue of Elle Driver's speech when she was killing Bud in the second movie. Needless to say, this is one of my favorite movies of all time. I based my nails on one of the movie posters for the first movie. I've actually never seen this one before, but this is an official movie poster for the film. It's pretty cool and basically sums up the movie, so I thought it would be perfect to do a design around it. Now onto the design!
Colors Used:
I'm really proud of these nails and love how they came out! I'm still getting used to doing letters with my brush, but I think I'm getting better at it.
What do you think of this design? What's your favorite movie? Tomorrow is inspired by a book!
Until next time!
I'm really excited for these nails because it's inspired by one of my favorite movies: Kill Bill. I think I've seen the movie like 100 times already. In my sophomore year of college, I even did a monologue of Elle Driver's speech when she was killing Bud in the second movie. Needless to say, this is one of my favorite movies of all time. I based my nails on one of the movie posters for the first movie. I've actually never seen this one before, but this is an official movie poster for the film. It's pretty cool and basically sums up the movie, so I thought it would be perfect to do a design around it. Now onto the design!
Colors Used:
Sally Hansen's Mellow Yellow
O.P.I's A-Piers to be Tan
Sinful Colors Energetic Red
Sinful Colors Black on Black
Sinful Colors Slate
Wet n Wild's French White Creme
China Glaze Fairy Dust
For the pinky, I based it on The Bride's signature yellow tracksuit. I used one coat of Sally Hansen's Mellow Yellow as the base color. With a detail brush, I used Sinful Colors Black on Black to make a thick black line near the end of the nail.
The ring finger is based on the background of the poster. I used one coat of Sally Hansen's Mellow Yellow and then with a piece of a makeup sponge, I sponged on Sinful Colors Energetic Red on half of the nail. With my detail brush, I wrote "Kill Bill" on the nail.
The middle finger is the Hanzo sword (or my attempt at the Hanzo sword haha). I used one coat of Mellow Yellow. With my detail brush, I made the sword's base using Sinful Colors Black on Black. The golden part of the sword I made a small square using O.P.I's A-Piers to be Tan. Finally, I made the sword blade with Sinful Colors Slate and made a thin white line as a highlight with Wet n Wild's French White Creme.
The pointer represents blood splatter. I used a coat of Sally Hansen's Mellow Yellow. For the splatter, I used a cut up straw. I dipped one of the ends with Sinful Colors Energetic Red. Next, I blew into the straw to create the blood splatter.
The thumb represents The Bride's sleeve from her dress. With a very thin striper brush, I made a criss-cross pattern to resemble lace. Finally, I topped it off with China Glaze's Fairy Dust.
I'm really proud of these nails and love how they came out! I'm still getting used to doing letters with my brush, but I think I'm getting better at it.
What do you think of this design? What's your favorite movie? Tomorrow is inspired by a book!
Until next time!
Sunday, September 22, 2013
31DC2013 Day 22: Inspired by a Song
Hey everyone!
Today's prompt is inspired by a song! I love K-pop, so I decided to do a K-pop song. It was really hard to choose one for today.
I was inspired by Akdong Musician's MV for their song "I Love You". It's a really cute song and I actually already planned to do this design a few months back, so today was perfect to try it out.
Colors Used:
Wet n Wild's French White Creme
Sinful Colors Rainstorm
Sally Hansen's Mellow Yellow
Sinful Colors Lavender
Wet n Wild's I Need a Refresh-mint
Sinful Colors Pink Forever
Sinful Colors Starfish
NYC's Big Apple Red Creme
Sinful Colors Nude
Each nail represents something in the MV.
The pinky represents the hearts floating in the air. I did a freehand heart with Sinful Colors Starfish. Then, I made smaller hearts with a dotting tool with Sinful Colors Lavender, Starfish, and Wet n Wild's I Need a Refresh-mint.
The ring finger represents the red dress that Soo-hyun wears. I painted two coats of NYC's Big Apple Red Creme. With my detail brush, I painted the word "I Love You".
The middle finger represents Chan-hyuk's bowtie. I painted one coat of Sinful Colors Rainstorm. With a dotting tool, I made polka dots on the nail with Sally Hansen's Mellow Yellow. With my detail brush, I made the petals to the flowers with Wet n Wild's French White Creme.
The pointer represents Soo-hyun's collar on her shirt. I painted two coats of Mellow Yellow on my nail. With a dotting tool, I created dots with Sinful Colors Lavender.
The thumb represents one of the cookies that they eat. I painted one thick coat of French White Creme onto my nail. Then, I free-handed a heart with Sinful Colors Nude. With a dotting tool, I made smaller hearts as the sprinkles of the cookies with Sinful Colors Pink Forever and Big Apple Red Creme.
Today's prompt is inspired by a song! I love K-pop, so I decided to do a K-pop song. It was really hard to choose one for today.
I was inspired by Akdong Musician's MV for their song "I Love You". It's a really cute song and I actually already planned to do this design a few months back, so today was perfect to try it out.
Colors Used:
Wet n Wild's French White Creme
Sinful Colors Rainstorm
Sally Hansen's Mellow Yellow
Sinful Colors Lavender
Wet n Wild's I Need a Refresh-mint
Sinful Colors Pink Forever
Sinful Colors Starfish
NYC's Big Apple Red Creme
Sinful Colors Nude
Each nail represents something in the MV.
The pinky represents the hearts floating in the air. I did a freehand heart with Sinful Colors Starfish. Then, I made smaller hearts with a dotting tool with Sinful Colors Lavender, Starfish, and Wet n Wild's I Need a Refresh-mint.
The ring finger represents the red dress that Soo-hyun wears. I painted two coats of NYC's Big Apple Red Creme. With my detail brush, I painted the word "I Love You".
The middle finger represents Chan-hyuk's bowtie. I painted one coat of Sinful Colors Rainstorm. With a dotting tool, I made polka dots on the nail with Sally Hansen's Mellow Yellow. With my detail brush, I made the petals to the flowers with Wet n Wild's French White Creme.
The pointer represents Soo-hyun's collar on her shirt. I painted two coats of Mellow Yellow on my nail. With a dotting tool, I created dots with Sinful Colors Lavender.
The thumb represents one of the cookies that they eat. I painted one thick coat of French White Creme onto my nail. Then, I free-handed a heart with Sinful Colors Nude. With a dotting tool, I made smaller hearts as the sprinkles of the cookies with Sinful Colors Pink Forever and Big Apple Red Creme.
![]() |
| Closeup of the thumb |
I really like how these came out. I need to work on my freehand hearts though haha. A link to the video will be on the bottom if anyone wants to hear the song!
What do you think of this design? Tomorrow is inspired by a movie!
Until next time!
Saturday, September 21, 2013
31DC2013 Day 21: Inspired by a Color
Hey everyone!
Sorry for the late post, but my girlfriend came over today and we hung out for the day at my place. I showed her all the nail tricks haha. She was so amazed when I was showing her things, it was cute.
For today's prompt, it kind of confused me for a little bit. How can you be inspired by a color? I had a hard time with it to say the least.
I wanted to use one of my newer polishes that I bought for my birthday. I've been wanting to do a autumn manicure for a few days, and today was the opportunity to do it.
Colors Used:
O.P.I's Schnapps Out of It
Sinful Colors All About You
Sinful Colors Black on Black
For this design, I painted my nails one coat of O.P.I's Schnapps Out of It. Next, I made thin lines with Sinful Colors Black on Black with my detail/striper brush. Finally, I topped the design off with Sinful Colors All About You for a nice golden sparkle to give it that autumn feel to it.
We're almost to the home stretch with the 31 Day Challenge! I hope I can finish out strong because I'm sort of running out of ideas haha.
How's everyone doing with the challenge? Tomorrow is inspired by a song!
Until next time!
Sorry for the late post, but my girlfriend came over today and we hung out for the day at my place. I showed her all the nail tricks haha. She was so amazed when I was showing her things, it was cute.
For today's prompt, it kind of confused me for a little bit. How can you be inspired by a color? I had a hard time with it to say the least.
I wanted to use one of my newer polishes that I bought for my birthday. I've been wanting to do a autumn manicure for a few days, and today was the opportunity to do it.
Colors Used:
O.P.I's Schnapps Out of It
Sinful Colors All About You
Sinful Colors Black on Black
For this design, I painted my nails one coat of O.P.I's Schnapps Out of It. Next, I made thin lines with Sinful Colors Black on Black with my detail/striper brush. Finally, I topped the design off with Sinful Colors All About You for a nice golden sparkle to give it that autumn feel to it.
We're almost to the home stretch with the 31 Day Challenge! I hope I can finish out strong because I'm sort of running out of ideas haha.
How's everyone doing with the challenge? Tomorrow is inspired by a song!
Until next time!
Labels:
31dc2013,
nail art,
nail polish,
nails,
o.p.i,
sinful colors,
stripes
Friday, September 20, 2013
31DC2013 Day 20: Watermarble
Hey everyone!
Day 20 is watermarble nails. I think everyone who does their nails fear the dreaded watermarble manicure at one point or another. I was totally dreading doing these before I even started the challenge. Today, I think I might have broken my fear of watermarbling because they turned out AMAZING! I don't know if I just got lucky or what, but these are awesome and I'm really proud of them.
Colors Used:
Wet n Wild's French White Creme
Color Club's Eternal Beauty
Color Club's Over the Moon
For these watermarble nails, you'll need some tape, a dotting tool or toothpick, and some room temperature water. I used bottled water for mine, but you can use distilled water and room temperature tap water as well. It's best to get out all your materials first so you're not getting them all together while doing your nails.
First, I painted my nails one coat of Wet n Wild's French White Creme. Once the base color dried, I poured some water in a cup (an old cup or container will do).
Next, I put tape around my nails to make it easier to clean up. You can use Vaseline as well if you don't have tape. Once the nail is taped up, I put a drop of each color into the water. It'll make a bullseye pattern when you're finished.
With a small dotting tool (preferably the smallest one as it has a point to it), I lightly dragged it across the polish.
Next, I dipped my finger into the polish. To make it easier, I curved my finger a little so I could get the polish right on the nail. To get rid of the excess polish, I used an old pencil (you can use a toothpick as well) and twirled it around so that the polish would get on the pencil.
Finally, I took my finger out of the water, took the tape off, and cleaned up around the nail using some Q-tips or a cleanup brush dipped in nail polish remover. You can add a top coat as well, but mine started to bubble and ate up the polish a bit as you can see in the photos. It might be my top coat, but I'm not too sure.
These Color Club Halo Hues polishes were great to work with for the watermarble. I'm not sure if all the Color Club polishes are like this when it comes to watermarbling, but these were great. I'm definitely not afraid of doing watermarble nails now. They take a lot of work, but I can do them. This is my third attempt at them, so I guess third times a charm!
What do you think of this design? Tomorrow is inspired by a color!
Until next time!
Day 20 is watermarble nails. I think everyone who does their nails fear the dreaded watermarble manicure at one point or another. I was totally dreading doing these before I even started the challenge. Today, I think I might have broken my fear of watermarbling because they turned out AMAZING! I don't know if I just got lucky or what, but these are awesome and I'm really proud of them.
Colors Used:
Wet n Wild's French White Creme
Color Club's Eternal Beauty
Color Club's Over the Moon
For these watermarble nails, you'll need some tape, a dotting tool or toothpick, and some room temperature water. I used bottled water for mine, but you can use distilled water and room temperature tap water as well. It's best to get out all your materials first so you're not getting them all together while doing your nails.
First, I painted my nails one coat of Wet n Wild's French White Creme. Once the base color dried, I poured some water in a cup (an old cup or container will do).
Next, I put tape around my nails to make it easier to clean up. You can use Vaseline as well if you don't have tape. Once the nail is taped up, I put a drop of each color into the water. It'll make a bullseye pattern when you're finished.
With a small dotting tool (preferably the smallest one as it has a point to it), I lightly dragged it across the polish.
Next, I dipped my finger into the polish. To make it easier, I curved my finger a little so I could get the polish right on the nail. To get rid of the excess polish, I used an old pencil (you can use a toothpick as well) and twirled it around so that the polish would get on the pencil.
Finally, I took my finger out of the water, took the tape off, and cleaned up around the nail using some Q-tips or a cleanup brush dipped in nail polish remover. You can add a top coat as well, but mine started to bubble and ate up the polish a bit as you can see in the photos. It might be my top coat, but I'm not too sure.
These Color Club Halo Hues polishes were great to work with for the watermarble. I'm not sure if all the Color Club polishes are like this when it comes to watermarbling, but these were great. I'm definitely not afraid of doing watermarble nails now. They take a lot of work, but I can do them. This is my third attempt at them, so I guess third times a charm!
Until next time!
Thursday, September 19, 2013
31DC2013 Day 19: Galaxy
Hello everyone!
Today's prompt is galaxy nails. This is actually my first time ever doing them, and I'm very pleased with the results! I think it looks awesome. Although, I had to literally write down the color order for the colors used in this design and what order to do them in. It got complicated for a minute haha.
The first time that I did it on the nail, I messed up completely and forgot what order I did the colors in. The second time I got it down. Here are the results!
Colors Used:
Zoya's Shivon (base color)
Sinful Colors Starfish
Wet n Wild's Tickled Pink
Color Club's Take Me to Your Chateau
Sinful Colors Let's Meet
NYC's Mulberry Street
Wet n Wild's French White Creme (dots and stars)
China Glaze's Fairy Dust
For these galaxy nails, I first painted one coat of Zoya's Shivon as my base color. Once that dried, I ripped up pieces of a makeup sponge. If you don't want to rip up a new one, grab an old one that you've used before (for gradients or if you use it for your makeup) and rip that up. That way you're saving up on your materials and not wasting up a new one.
Next, I put a couple drops of polish onto a scrap piece of paper. Then, I grabbed a piece of the makeup sponge with some tweezers (you can do this by hand as well) and dip it into the polish. Lightly dab the color onto the nail. Dabbing it on too heavily will mess it up and leave you with blobs of polish on the nail. To avoid this, dab the sponge a few times on the scrap piece of paper. Repeat with all the colors. If needed, you can go over again with the colors on certain spots.
After you've dabbed all the colors onto the nail, with a dotting tool or detail brush, make small dots onto the nail. For the stars, I made dots into a cross and connected them to make the stars. If you want the stars to have that point, use a detail/striper brush and make the points. Finally, I added China Glaze's Fairy Dust for some sparkle and to give it more of the galaxy look. If you want, you can add a top coat for some extra shine.
I think these turned out great for my first time! I'll definitely be doing more galaxy nails in the future. I might try out a darker version.
What do you think of this design? Tomorrow is water marble (oh boy!) I'm nervous for those!
Until next time!
Today's prompt is galaxy nails. This is actually my first time ever doing them, and I'm very pleased with the results! I think it looks awesome. Although, I had to literally write down the color order for the colors used in this design and what order to do them in. It got complicated for a minute haha.
The first time that I did it on the nail, I messed up completely and forgot what order I did the colors in. The second time I got it down. Here are the results!
Colors Used:
Zoya's Shivon (base color)
Sinful Colors Starfish
Wet n Wild's Tickled Pink
Color Club's Take Me to Your Chateau
Sinful Colors Let's Meet
NYC's Mulberry Street
Wet n Wild's French White Creme (dots and stars)
China Glaze's Fairy Dust
![]() |
| Natural light |
For these galaxy nails, I first painted one coat of Zoya's Shivon as my base color. Once that dried, I ripped up pieces of a makeup sponge. If you don't want to rip up a new one, grab an old one that you've used before (for gradients or if you use it for your makeup) and rip that up. That way you're saving up on your materials and not wasting up a new one.
Next, I put a couple drops of polish onto a scrap piece of paper. Then, I grabbed a piece of the makeup sponge with some tweezers (you can do this by hand as well) and dip it into the polish. Lightly dab the color onto the nail. Dabbing it on too heavily will mess it up and leave you with blobs of polish on the nail. To avoid this, dab the sponge a few times on the scrap piece of paper. Repeat with all the colors. If needed, you can go over again with the colors on certain spots.
![]() |
| Natural light |
After you've dabbed all the colors onto the nail, with a dotting tool or detail brush, make small dots onto the nail. For the stars, I made dots into a cross and connected them to make the stars. If you want the stars to have that point, use a detail/striper brush and make the points. Finally, I added China Glaze's Fairy Dust for some sparkle and to give it more of the galaxy look. If you want, you can add a top coat for some extra shine.
![]() |
| With flash |
![]() |
| Natural light |
What do you think of this design? Tomorrow is water marble (oh boy!) I'm nervous for those!
Until next time!
Labels:
31dc2013,
china glaze,
color club,
galaxy,
nail art,
nail polish,
nails,
NYC,
sinful colors,
wet n' wild,
zoya
Wednesday, September 18, 2013
31DC2013 Day 18: Half Moons
Hey everyone!
Today is half moons! This one was kind of hard because I went through a couple ideas and they didn't look very good when I did them. I almost trashed this one, but I'm actually feeling it at the moment.
I've only done half moons a couple of times, but I like doing the traditional one where the nail is bare underneath. The two times that I did it before when I was in the process of coming up with ideas, I did the one with two colors. I don't know why, but those never come out good for me. I should probably practice those. Anyways, onto the half moons!
Colors Used:
Sinful Colors Starfish
Wet n Wild's French White Creme
China Glaze's Fairy Dust
For these half moon nails, you're going to need reinforcements. If you don't have those, you can always do it freehand as well. After I put on my base coat, I placed the reinforcements on my nails. You want to place them near the bottom of your nails. To make it a little easier on myself, I cut the reinforcements in half. You don't have to do this if you don't want to.
Next, I painted Sinful Colors Starfish onto the nail. With this design, you want to get a color that's opaque in one coat to make it easier. Once you paint all the nails, wait a minute and then peel off the reinforcements.
Once the polish is dry, you can either leave it or add to it. I decided to add to it because it brings it out more. For the stripes, I used my detail/striper brush. With the brush, I made thin white lines to cover the pink. Finally, I painted one coat of China Glaze's Fairy Dust for some sparkle and then a top coat to finish it off.
These are kind of girly, but I really like them! The stripes really bring out this design. I will definitely try this out again soon.
What do you think of this design? Tomorrow is galaxy nails!
Until next time!
Today is half moons! This one was kind of hard because I went through a couple ideas and they didn't look very good when I did them. I almost trashed this one, but I'm actually feeling it at the moment.
I've only done half moons a couple of times, but I like doing the traditional one where the nail is bare underneath. The two times that I did it before when I was in the process of coming up with ideas, I did the one with two colors. I don't know why, but those never come out good for me. I should probably practice those. Anyways, onto the half moons!
Colors Used:
Sinful Colors Starfish
Wet n Wild's French White Creme
China Glaze's Fairy Dust
For these half moon nails, you're going to need reinforcements. If you don't have those, you can always do it freehand as well. After I put on my base coat, I placed the reinforcements on my nails. You want to place them near the bottom of your nails. To make it a little easier on myself, I cut the reinforcements in half. You don't have to do this if you don't want to.
Next, I painted Sinful Colors Starfish onto the nail. With this design, you want to get a color that's opaque in one coat to make it easier. Once you paint all the nails, wait a minute and then peel off the reinforcements.
Once the polish is dry, you can either leave it or add to it. I decided to add to it because it brings it out more. For the stripes, I used my detail/striper brush. With the brush, I made thin white lines to cover the pink. Finally, I painted one coat of China Glaze's Fairy Dust for some sparkle and then a top coat to finish it off.
These are kind of girly, but I really like them! The stripes really bring out this design. I will definitely try this out again soon.
What do you think of this design? Tomorrow is galaxy nails!
Until next time!
Tuesday, September 17, 2013
31DC2013 Day 17: Glitter
Afternoon everyone!
Day 17 is glitter and I have a swatch of Funky Fingers Jawbreaker for you today. I got this polish as a early birthday gift from my girlfriend, but Funky Fingers nail polish can be purchased at Five Below. This polish costs $3, and is a part of their 3 polishes for $5 special that they usually have.
Jawbreaker is a mix of different sized multi-colored glitters in a milky white base. This is three coats with a top coat, but two coats would have been better.
From what I can see, there's red, teal, yellow, blue, and purple glitters in the polish. There's a good variety of glitters in this polish. The application was very good. I didn't really have to do the dabbing method with this polish. Also, the drying time between coats is very fast, which is one of the things that I like most about this polish.
Another thing that I like is that it's basically a jelly sandwich in a bottle! I guess it's the lazy way to a jelly sandwich, but that's okay to me.
Overall, I'm really liking this polish and it's a great deal for the price of it! I don't know how much I will be using it because it's so much glitter and could be a pain to take off, but I can see myself going to this polish when I want a quick glitter fix.
Day 17 is glitter and I have a swatch of Funky Fingers Jawbreaker for you today. I got this polish as a early birthday gift from my girlfriend, but Funky Fingers nail polish can be purchased at Five Below. This polish costs $3, and is a part of their 3 polishes for $5 special that they usually have.
![]() |
| Without flash |
From what I can see, there's red, teal, yellow, blue, and purple glitters in the polish. There's a good variety of glitters in this polish. The application was very good. I didn't really have to do the dabbing method with this polish. Also, the drying time between coats is very fast, which is one of the things that I like most about this polish.
Another thing that I like is that it's basically a jelly sandwich in a bottle! I guess it's the lazy way to a jelly sandwich, but that's okay to me.
![]() |
| With flash |
Labels:
31dc2013,
funky fingers,
nail polish,
nails,
review,
swatch
Monday, September 16, 2013
31DC2013 Day 16: Tribal Print
Whew! I'm finally all caught up now.
Today's prompt is tribal print. I've done a tribal print in one of my earlier posts, but I've never done one where there's a mix match of different designs on it. It was actually quite simple to do, although I think I should have used a black polish instead of white for the designs. But for my first try with this kind of tribal print, I think I did okay.
Colors Used:
Color Club's Over the Moon
Wet n Wild's French White Creme
For this design, I first painted one coat of Color Club's Over the Moon (this is turning out to be one of my favorite polishes right now). Then, with a detail brush, I painted different designs using lines, dots, and zig zag patterns. You can basically do whatever design you want for these tribal print nails. Finally, I finished my design with a top coat.
I wish I had used a black polish, but I think they turned out fine. I would definitely try this kind of tribal print design again.
What do you think of the design? I'm all caught up now, tomorrow is glitter nails!
Until next time!
Today's prompt is tribal print. I've done a tribal print in one of my earlier posts, but I've never done one where there's a mix match of different designs on it. It was actually quite simple to do, although I think I should have used a black polish instead of white for the designs. But for my first try with this kind of tribal print, I think I did okay.
Colors Used:
Color Club's Over the Moon
Wet n Wild's French White Creme
For this design, I first painted one coat of Color Club's Over the Moon (this is turning out to be one of my favorite polishes right now). Then, with a detail brush, I painted different designs using lines, dots, and zig zag patterns. You can basically do whatever design you want for these tribal print nails. Finally, I finished my design with a top coat.
I wish I had used a black polish, but I think they turned out fine. I would definitely try this kind of tribal print design again.
What do you think of the design? I'm all caught up now, tomorrow is glitter nails!
Until next time!
Labels:
31dc2013,
color club,
nail art,
nail polish,
nails,
tribal,
wet n' wild
31DC2013 Day 15: Delicate Print
I'm almost caught up for the challenge! This day was a challenge in itself, but I'm having fun though.
For day 15's prompt, I didn't exactly do a nail art design. I couldn't really come up with a delicate print, but I think that this will count for it.
Colors Used:
China Glaze's Fairy Dust
Sinful Colors Social Ladder
I absolutely love this combination! It's so light and delicate. I'm really glad that I picked up China Glaze's Fairy Dust as one of my birthday polishes. This has been on my wish list for a while. It was the last one at the beauty store that I go to to get polishes as well. I will be swatching this one as well after the challenge.
For this look, I painted one coat of Sinful Colors Social Ladder. If you don't want your nail showing underneath, you can paint more coats until it's opaque. Finally, I painted 2-3 coats of Fairy Dust for some extra sparkle.It's so pretty in these photos!
What do you think of this look? Next up is tribal print!
For day 15's prompt, I didn't exactly do a nail art design. I couldn't really come up with a delicate print, but I think that this will count for it.
Colors Used:
China Glaze's Fairy Dust
Sinful Colors Social Ladder
I absolutely love this combination! It's so light and delicate. I'm really glad that I picked up China Glaze's Fairy Dust as one of my birthday polishes. This has been on my wish list for a while. It was the last one at the beauty store that I go to to get polishes as well. I will be swatching this one as well after the challenge.
For this look, I painted one coat of Sinful Colors Social Ladder. If you don't want your nail showing underneath, you can paint more coats until it's opaque. Finally, I painted 2-3 coats of Fairy Dust for some extra sparkle.It's so pretty in these photos!
What do you think of this look? Next up is tribal print!
Subscribe to:
Posts (Atom)