Showing posts with label nail art. Show all posts

Wednesday, January 21, 2015

BPS Nail Stamper Review

*Provided for review*

Hello everyone!

It's been quite some time since I posted last. Last year was pretty stressful and hectic, but exciting at the same time. I moved into my own apartment, I received an opportunity to edit a novel (which is actually going pretty well and more books to come!), and I got a job. 

I've really missed blogging and just doing my nails in general. This year, I hope to post more on the blog and get back to where I was before. I will try and work hard, but at the same time I want to have fun with it. I don't want to feel burned out like I was before. So hopefully, you will bare with me while I get myself together. 

Anyways, for today I have a review of a nail stamper from The Born Pretty Store. Now, I'm a total beginner when it comes to stamping. I don't really do stamping often, but when I do I pretty much fail. However, I actually really like stamping now and I liked this stamper. That's saying a lot right there. It took a bit of practice, but I like it now. Let's get to the review!


This set comes with a stamper and a scraper. The stamper is plastic, which is different from my other stamper that is rubber. I actually like the plastic because I can get a better grip on it and have more control. With the rubber, it felt like it slipped out of my hands a lot (or perhaps that's just me being clumsy lol). This stamper set is $3.47, which I think is very affordable. I also like the size of it. It's great because I have small nails so it fits on my nails, but it also works with long nails as well. 


For these nails, I used three coats of Color Club Tiny Umbrella for my base color. The best way to not ruin your nails is to wait until the polish dries and then use a top coat before you do any stamping. It creates a less chance of you ruining your nails and makes it easier to remove the stamp if you mess up. 

Next, I placed the polish on the stamp of my choice. I used Color Club French Tip. Then, I used the scraper to take off the excess polish. With the stamper, I pressed down enough to get the polish to stick to the stamp, and rolled the stamper across my nail. With this, you'll want to be very fast. These three steps you should do in 10-15 seconds or you'll have to start over. 

With the stamper, you have to press a little hard on your nail to get the stamp on fully, but I didn't mind that. It took me a few tries, but you get the hang of it (after the first 100 times lol). 

Finally, I used Out the Door Top Coat to finish the design. As you can see, it streaked a bit, so don't mind that.


Overall, I like this stamper. I can't wait to get more stamping plates and practice stamping more. You can get this stamper and other nail supplies from the Born Pretty Store. You can also use my coupon code SHBQ10 for an extra 10% off your purchase!

Thanks for reading! Let me know what you think!

Tuesday, July 1, 2014

BPS Nail Bows

Hey everyone!

I almost didn't post this because I get so lazy when it's hot. It's literally 90 degrees over here right now. How is everyone doing with the heat? I hope everyone stays cool! 

This Born Pretty Store review is so long overdue it's not even funny. I think that this is my first time with nail bows, so I was excited to get these to review. Let's take a look!


 The nail bows come in a pack of 10. I chose these cute black and pink polka dotted bows. These are $2.86 for 10 of them at the Born Pretty Store, which is quite a steal! 

 For these nails, I painted my nails with Sinful Colors Black on Black as my base color.

For the polka dots, I used a dotting tool and Sinful Colors Candy Coated and Sweet Tooth (accent nail).


For applying the bow, you can go about it two ways. The first way is just using a fast drying top coat and applying a dot of it where you want to place the bow. The top coat that I used and has worked for me when applying nail accessories is the Beauty Plus Salon top coat shown in the photos.

The second option is to use nail glue. The first time that I wore these I didn't have nail glue on hand. Both will work just fine, but it's up to the person.


As far as the nail bows themselves, they didn't stay on as long as I wanted them to. I'm very heavy on my hands, especially at work which is when I did wear them the first time. They were falling off all over the place to the point where I just ripped them off (alright a little exaggeration lol) and continued working.  Even when I wasn't doing anything, I found them kind of loosening off the nail.

They were also kind of flimsy and broke very easily. I used the tweezers so I could pick them up and they snapped in half. I had a few of them do that to me, which was odd. 

Overall, these were okay. Like I always say, these are not really for long term wear. These bows are for one day usage for me or for a special occasion. They didn't stay on my nails long enough for me to really enjoy them though. Honestly, I wouldn't buy them again.

You can get these nail bows for $2.86 and other nail art supplies at the Born Pretty Store. You can also use my coupon code SHBQ10 for an extra 10% off your entire purchase!


What do you think of these nail bows?

Thanks for reading! 

 *This product was provided to me for my honest review*

Thursday, June 19, 2014

Daisies Nail Art

Long time no see everyone!

Wow, it's been a while since I posted, but I'm pretty much back into blogging now!. I'm all settled into my new place for the most part, so I have time to do my nails and blog finally. Everything is going well for the most part. Also, my nails aren't fully where I want them to be yet, but I'll live lol.

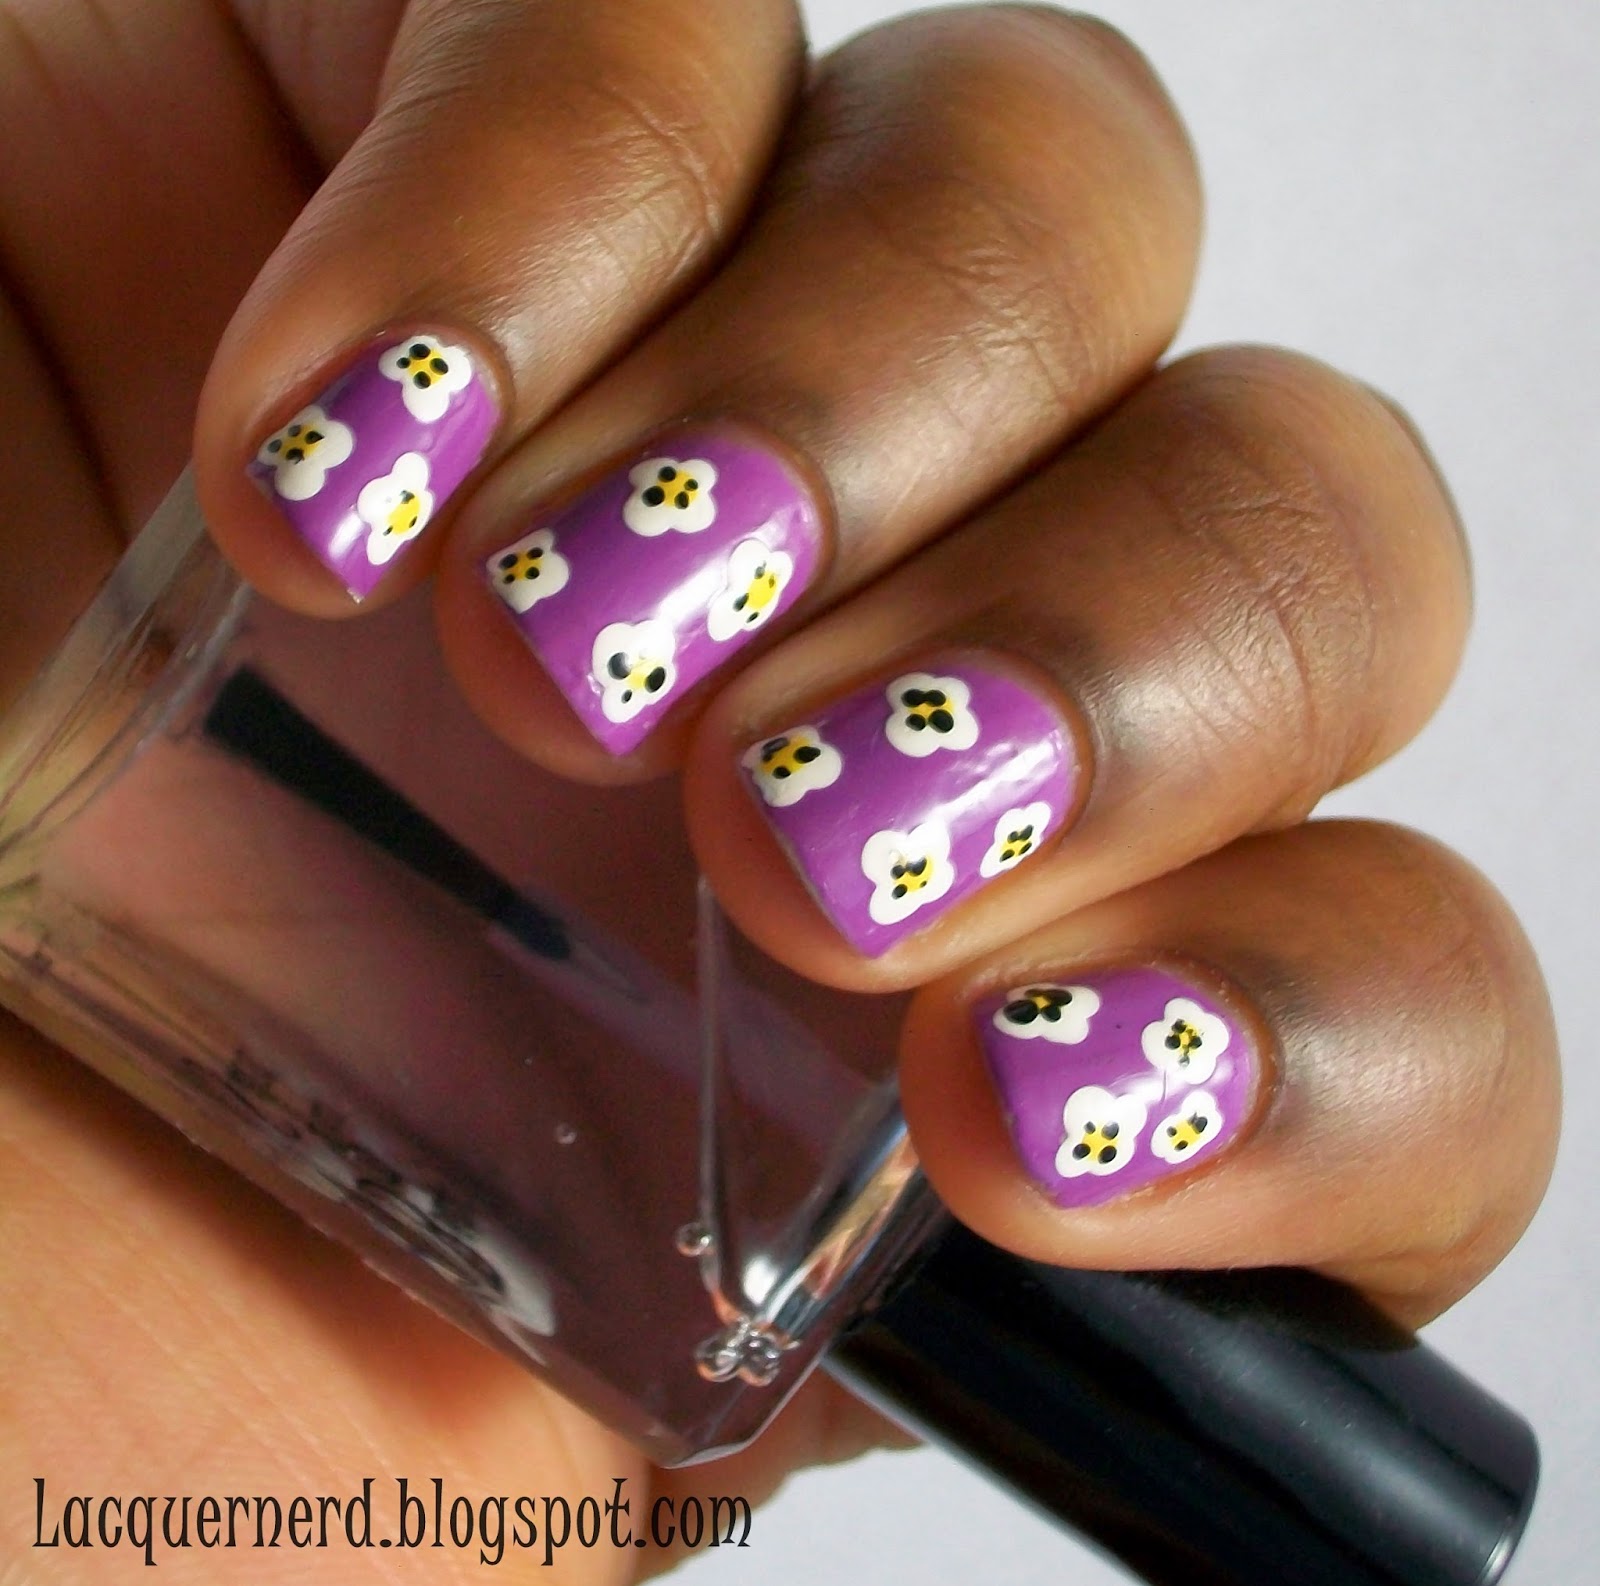
For today's nails, I've really been in a summer mood lately. Summer is my least favorite season, but I've been wearing a lot of bright nail colors and designs. I wanted to do a flower design, so I decided to do daisies on my nails. This is a really cute and simple design that anyone can do!

Anyways, let's get to the nails!


For these nails, I used Color Club's Lavendarling for the base color.


Next, I used white acrylic paint and a dotting tool to create the daisies. To make the daisies, make two dots and then make two dots below so that they connect to one another. 


With yellow acrylic paint, I created the center of the flower with a dotting tool. With a smaller dotting tool, I created small black dots around the yellow center to make the flowers pop out more. 

Finally, I sealed my design with a top coat.


These were really fun to do. I wish I had made the black dots a tad smaller, but I love the final outcome of the nails. You can do this design with any colors for a different look.

What do you think of these nails? What's your favorite flower?

Thanks for reading!

Monday, April 7, 2014

Ben de la Creme Inspired Nails

Hello everyone!

Today I have a nail art design inspired by one of my favorite shows: RuPaul's Drag Race! It's one of the few shows that I actually try to catch up on and I've been watching it ever since it came on. Plus, it's kind of good to post it now since there's going to be a double episodes tonight lol.

RuPaul's Drag Race is in it's sixth season, and I was inspired by one of the queen's outfits from the last episode. Her name is Ben de la Creme and she's one of my favorites this season. She's really talented and gorgeous and I loved this snow leopard print outfit she was wearing in this episode. It's probably one of my favorite runway looks ever.

Source: Google
Anyways, let's get to the nails!


For these nails, I used Sinful Colors Sweet Nothing for the pointer and pinky fingers. For the middle and ring, I used an unnamed silver glitter by Color Club.


Next, I created leopard print spots with a dotting tool using Sinful Colors Slate and Snow Me White. Using a detail brush, I outlined the spots with Sinful Colors Black on Black.

Finally, I finished off with a top coat.


These were very fun and simple to do. I couldn't think of anything to go on the blue, so they do look a little plain. I still love them though. The season will be over soon-ish, but maybe if I'm inspired, I'll do some more nail art inspired by some of the other queens!

Thanks for reading!

Wednesday, April 2, 2014

Galaxy Nails

Hey everyone!

Today I have some nail art for you! This was actually going to be more than just galaxy nails, they were going to be galaxy cat nails. Unfortunately, the idea didn't really work out so I just stuck with doing just the galaxy. I'll probably try to do it again because who doesn't like galaxy cats lol.

Although I will say that it's a first for me doing a dark galaxy nail. I really like them, so let's check them out!


For these nails, I used Sinful Colors Black on Black as the base color. For the colors of the galaxy I used Sinful Colors Rise and Shine, Snow Me White, Cream Pink, and Amethyst, an unnamed Color Club polish, and China Glaze Fairy Dust. 


I used the same method as my other galaxy nails that I did during the 31 Day Challenge. Instead of using a makeup sponge, I used q-tips instead. I feel like the q-tips gave it more of a galaxy feel than with using a sponge.


Even though this is my second time doing galaxy nails, I really like these. You really can't mess up galaxy nails and they're so simple to do. I'm going to try doing those galaxy cat nails though even if they will look like crap lol. 

What do you think of these nails? Do you prefer dark or light galaxy nails?

Thanks for reading!

Monday, March 17, 2014

St. Patricks Day Nails

Happy St. Paddy's Day everyone!

I don't really celebrate St Patrick's Day, but I decided to do a simple nail art design for today. I didn't really want anything too fancy, so I went the simple but festive route with these nails.


For this design, I used striping tape to create the lines. After applying my base coat, I placed two pieces of tape onto the nail for the lines. With the bottle brush, I filled in the spaces with Sally Hansen's Sunkissed, Sinful Colors Snow Me White, and Essie Mojito Madness.


With a detail brush, I created accent lines using Sinful Colors Gold Metal. Next, I placed a dot of top coat on the bottom of the white stripe and placed a gold gem on each nail. Finally, I finished off with a top coat to seal in the gems and design.


I love how this design looks. I haven't used striping tape and gems in a while, so it was nice to use them in this manicure. Even though the two golds don't match exactly, I think it's a nice color combination. I think all the colors go together pretty well. I never thought that this color combination would look nice lol.


What do you think of these St Paddy Day nails? Do you celebrate St Paddy's Day?

Thanks for reading!

Tuesday, March 11, 2014

Strawberry Nails

Hello everyone!

Yesterday, I showed you all a swatch of China Glaze's Strawberry Fields. It inspired me to do some nail art with the polish. Plus, I just can't get enough of strawberries! Let's see the design!


For this design, I started out with Strawberry Fields as my base color. With a detail brush, I made rounded triangles for the strawberries (think of an upside down triangle with a rounded out bottom) with Essie Lights and Wet n Wild's Tickled Pink.


Next, I created the stems of the strawberries with my detail brush with Essie Mojito Madness. For the dots, I used a dotting tool and created dots in the empty spaces of the nail with Sinful Colors Snow Me White. Finally, I topped it off with a top coat.


I love this design. I think I could have used another coat of Essie Lights for the strawberries because the color kind of blends in with the base color. It is a good color for strawberries though (and roses too!). I wish I could keep it on my nails forever, but I know I'm going to get sick of it eventually lol. 

What do you think of this design? 

Thanks for reading!

Friday, March 7, 2014

Spring Rose Nails

Happy Friday everyone!

I have another nail art design to show you today! I did a classic rose design that's perfect for spring. I think I've been wanting some spring weather, but I know I'm not going to get it over here until April. Until then, I'll just keep my nails all bright and springy. 

This is a popular floral design that many have done, but I really like this design. Let's get to the design!


For this design, I started out with two coats of Sally Hansen's Lacey Lilac as the base color. With a dotting tool, I created polka dots with Sinful Colors Snow Me White for the background.


I used Essie's Lights, Wet n Wild's Tickled Pink and a dotting tool to make the roses. For the leaves, I used Essie's Mojito Madness with a detail brush. 

Finally, I topped it off with China Glaze's Fairy Dust.


I don't do roses often, but this is the first time that they've actually turned out really good. I want to incorporate more roses in my future nail art designs. This is a pretty popular design, but I'm glad that it came out really good.


What do you all think of this design? Let me know in the comments!

Thanks for reading!

Thursday, March 6, 2014

Triangle Border Nails

Hello everyone!

I finally had time for some nail art! It feels like forever since I've done nail art, which is kind of a problem lol. Actually, I did some nail art earlier in the week, but it didn't work out as planned. I took the photos and then realized that there was a hair on the nail and I had already put top coat on it! I was so devastated. Don't you just hate that? 

Enough of me rambling for now lol. For this nail design, I created a border design using triangles. There's so many things that you can do with triangles in designs. I've been sketching a lot of triangle nail art for some reason. Let's get to the design!


For this design, I painted two coats of Sinful Colors Rainstorm as the base color. 


With a detail brush, I alternated between Sinful Colors Snow Me White and Sinful Colors Sweet Nothing and created triangles around the nail. Finally, I sealed my design with a top coat.


I love how this design came out. It's a bold design, but it's also simple. I really like how it made a nice burst shape in the middle. I was contemplating on putting something in the middle, but I decided against it. I think if I added anything else, it would be way too busy. I like the balance in this design.


What do you think of this design? What's your favorite nail art to do?

Thanks for reading!

Wednesday, February 12, 2014

FXXX Love!

Hello everyone!

This is my 100th post on the blog! It's not that special, but it was something that I noticed today while writing this up haha.

I'm pretty sure everyone can tell what the theme is for today's nail art design just by the title. Today I'm showing you all my Anti-Valentines Day nails! I'm going to be honest and say that I never really enjoyed Valentines Day. This year will be different since I'm spending it with my girlfriend, but it has gotten on my nerves lately lol. Anyone like this as well?


For my FXXX Love nails, I used the following colors:
Sinful Colors Black on Black (base)
Wet n Wild's I Red a Good Book (base)
Sinful Colors Snow Me White
Sinful Colors Decadent (glitter)
Black Acrylic Paint
Maybelline's Clearly Spotted (glitter)


I created a mix n' match of designs for these nails using dotting tools and a detail brush.

For my pinky, I layered Clearly Spotted and Decadent together. On my ring finger, I wrote FXXX Love with black acrylic paint. If you can see it, I made a little broken heart underneath the letters. For my middle finger, I created three hearts with I Red a Good Book and crossed them out with Snow Me White. On my pointer, I created polka dots. Finally, I painted X's and O's on my thumb.


Originally, I used flocking powder for the accent nail, but decided against it. I like this version much better than what I had before. I think these are really cute and I'm pretty please with how the designs came out!


What do you think of these nails? Do you dislike Valentines Day?

Thanks for reading!

Friday, February 7, 2014

Hearts in a Row

Hello everyone!

I have another Valentine's Day themed design to show you today! Before I used to hate Valentines Day (still kind of do lol) but I've been having fun coming up with Valentines Day designs lately. This is a simple and cute design that I came up with today after one of my designs failed. Let's get to the design!


For this design, I applied two coats of Wet n Wild's I Red a Good Book (my favorite red polish right now!) as my base color.


With a dotting tool, I made three hearts going diagonal on the nail with Sinful Colors Snow Me White. Finally, I sealed my design with a top coat.


I love how simplistic this design is. It's really cute.  I wish I had used a different color than white because of the major glare on the photos, but I'm happy with it.

What do you think of this "Hearts in a Row" design?

Thanks for reading! 

Wednesday, February 5, 2014

Rainbow Colorblock Nails

Hey everyone!

I've been into bright colors lately because I'm still a little down. I originally wanted to do rainbow stripes, but it's been done so many times by others. I came up with these colorblock nails instead. I wanted to keep the stripe element, but also make them different. They're pretty simple to do (a little time consuming though) and you can use any amount of colors that you want. Let's get to the design!


For this design, I started off with a white base using Sinful Colors Snow Me White. To make the colors have an even amount of space, I made a straight line  in the middle of the nail using Sinful Colors Innocent and Endless Blue.


Next, I made another line using the same colors at the bottom of the nail side by side. Building up the colors, I repeated the same steps for the green and blue for the other colors. The colors I used are Wet n Wild's I Red a Good BookSally Hansen's SunkissedSinful Colors Let's MeetSinful Colors AmethystSinful Colors Dream On, and Sinful Colors Cream Pink.  


I freehanded this design with a detail brush, but you can also do this with a striper polish or brush.


I love how cool this design came out. If I look at it far away, it kind of looks like an optical illusion. I want to do it with more colors in the future.

What do you think of this design? Have you done colorblock nails before?

Thanks for reading!

Monday, February 3, 2014

Sinful Colors - Innocent

Hello everyone!

If you follow me on Instagram, I said that my internet was being really dumb, but now it's back on! I'm hoping that it doesn't cut off again, so I'm keeping my fingers crossed lol.

I have a swatch of Sinful Colors Innocent for you all today. I wanted a bright color to cheer me up since I've kind of been down lately. This color definitely cheered me up, especially with my new nail shape. My nails are round again! I forgot how much they look good rounded. But anyways, onto the swatches!


Sinful Colors Innocent is a lime green polish. In some lights, it looks like a yellowish green. This is two coats with a top coat. I received this polish as a gift, but Sinful Color polishes run for $1.99 at various stores.


I really had no problems with the application and formula. I did use two coats of base coat instead of one because it is a green polish, and green polishes are known to usually stain nails. Other than that, this was easy to work with.

I actually really love the color of this polish. I usually don't like to use greens except for nail art, but I love it on my nails. This polish might be on my top 10 list of my Sinful Colors polishes.


I really wanted to do some nail art, so I did some simple stripes down the middle of my nail using Sinful Colors Endless Blue. With a detail brush, I outlined the blue stripes with white acrylic pant. Finally, I sealed my design with a top coat.


This was such a simple design to do. I wanted to add more inside the blue stripe, but my design didn't look good lol. I'll settle with this for now though. It reminds me of football for some reason though. Is this a team's colors by any chance? 


Overall, I'm loving Innocent. It's so easy to work with and it looks great by itself or in nail art! I would recommend buying this polish for your collection if you're looking for an inexpensive lime green.

What do you think of this polish? 

Thanks for reading!

LinkWithin

Related Posts Plugin for WordPress, Blogger...